Zaadesh 2, or how I learned to stop worrying and love my Hydra
 I have liked Zaadesh at first sight, but it took quite a bit of time for me to have a good list with it. Actually, while I played it already at the 2017 Milan Master, it wasn’t before the release of Imperial Warhost that I did a list that actually clicked together. Since then, I have experimented a lot of variations on that beast-heavy list, and my current version have a relatively unusual inclusion, an hydra. This post present an analysis of the Imperial Warhost Zaadesh archetype, and why I converged on including an hydra.
Stock Zaadesh list
My first list - that Connetable PA, the former french WTC captain, found more or less at the same time as me - was :
[Theme] Imperial Warhost
- (Zaadesh 2) Lord Tyrant Zaadesh [+28]
- Agonizer [0(6)]
- Agonizer [0(6)]
- Archidon [10]
- Basilisk Krea [0(7)]
- Bronzeback Titan [18]
- Titan Gladiator [15]
- Titan Sentry [15]
- Titan Sentry [15]
- Gremlin Swarm [3]
- Paingiver Beast Handlers (min) [5]
- Paingiver Beast Handlers (min) [5]
- Siege Animantarax [17]
I consider that, more or less, the “stock” Zaadesh 2 list, the one that is easy to converge toward. While the exact beast setup is subject to debate, it have a lot of heavies, most at reach 2, and fun surprises with Defensive Strike. That list can do very well - Connetable PA did won the biggest french single player event with it, after all - because of several strong points :
- it’s the most intense armor skew in the current game. We talk of permanent, non-feat dependant armor 22 to 25 everywhere ; there are a lot of lists who litteraly cannot deal enough damage to kill yours beasts. And there is quite a bit of healing via the paingivers, too.
- Zaadesh is an extremely hard to kill caster, with decent stats backed by the very strong Sacrifical Pawn ability ; and he don’t really need to expose himself all that much. Counter Charge is another strong anti-assassination tool, who can mess with arc nodes, prevent shooting, or even obscure line of sight to Zaadesh. The fact it often allow to not camp on the caster is pretty useful too.
- Counter Charge, Defensive Strike from the feat, and the combination of Shield Guard and Hyper Aggressive give it an hefty “gotcha” potential.
Now, the list isn’t without drawback :
- the biggest one is that it don’t kill infantry terribly well. With infantry being more and more common on tables, games where your beasts cannot be killed but are endlessly jammed are becoming common. In thoses situations, playing second often mean you just can’t either contest or kill enough stuff to get a victory.
- the fury gestion isn’t very good. You can easily put 20 or 30 fury on the table, which take a lot of time to recover from.
- the list is slow, and prone to scenario problem against opponents who know how to get around counter charges and Hyper Aggressive.
- the list split between heavy hitters and defensive beasts, so if your opponent is able to focus fire on the gladiator and bronzeback you’re quickly in trouble in term of fire power.
- the list is very dependant on upkeep and animi, making especially Purification a problem.
Now, to be honest, only the first problem is a real problem to me. The rest are mostly minor problems. I tried several tweak to help against infantry, like putting two rhinodon in the list or one basilisk drake, but nothing seemed to help much with that problem. Until I tried the desert hydra.
The Desert Hydra
(note: an hydra is female in french, hence why I refer to the hydra as a she)
The key to her anti-infantry potential is the ability to mix melee attacks and spray. The usual method for infantry to deal with a colossal is to put two or three models in front, and the rest behind, so that they can charge your colossal after it wasted a turn dealing with three models. But the Hydra can charge, and then deliver four reasonably precise spray to the backline. They could in theory stay more than 5” away from the front line, but it’s much more troublesome than it seem. If the front guard is really close to your line, an archidon, or the caster with the archidon animus, can clear them and sprint away. If it’s just that they stay far back, they likely don’t contest anything, and the frontline can be sprayed on without entering in the charge range of the backline. And you can often engineer a charge that go past the front line by 2”, in order to be able to spray farther.
Because everything is better with schemas, here is an illustrated example, simplified from real game situations :
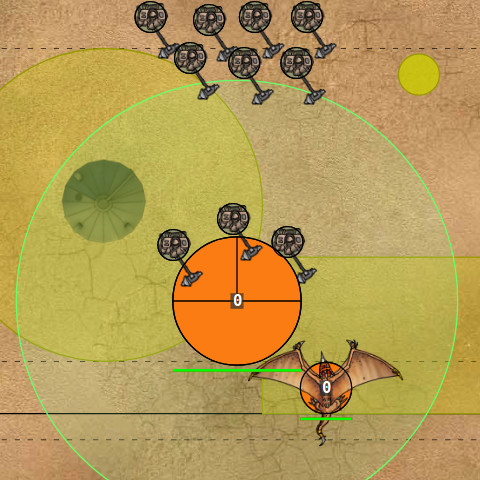
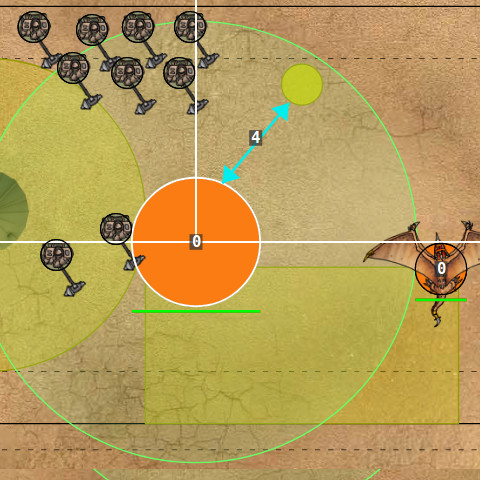
The orange blob is the hydra and the area around her is the range of her sprays. The first picture show just how far people have to go to avoid being in spray range ; in that example, they are pretty much out of the zone just to avoid sprays. The second picture show that with just the help of an archidon and one free strike, the hydra can nonetheless spray most of the unit and contest one zone and the flag. (note : the dwarve placement is illustrative and could be optimized a bit, but not to the point where most of the unit can be saved while preventing flag contestation)
The hydra is also rat 6, which is a lot for a boostable spray. That, and the big amount of spray save your fury to boost damage. Add Continuous Corrosion so that tough and armor bonus don’t ruin your day too much either. While the sprays will falter against some specific setup (typically infantry under Quicken/Blur, or the rare corrosion immune infantry), they tend to be deadly to all kind of infantry, and not just single wounders.
The other advantage she offer is sheer durability. While her durability relative to her point cost isn’t terribly high, it’s very hard to remove an hydra in a single turn, especially under Inviolable resolve and/or with an agonizer. Which mean you can put her in charge range of a much bigger part of the opposing army. For example, with an agonizer she can decently survive three fully loaded Griffins with maximum synergy (about ~47 damage on 52 boxes), while a sentry would be in serious jeopardy in such a situation (about ~33 damage on 30 boxes). That allow her to advance much more aggressively, making use of her pretty high speed.
For an illustration, here is some photo of a Welsh game (provided by the amazing Ben Thomas of ghyrrshyldsreturn fame). Here is the Vyros first turn :

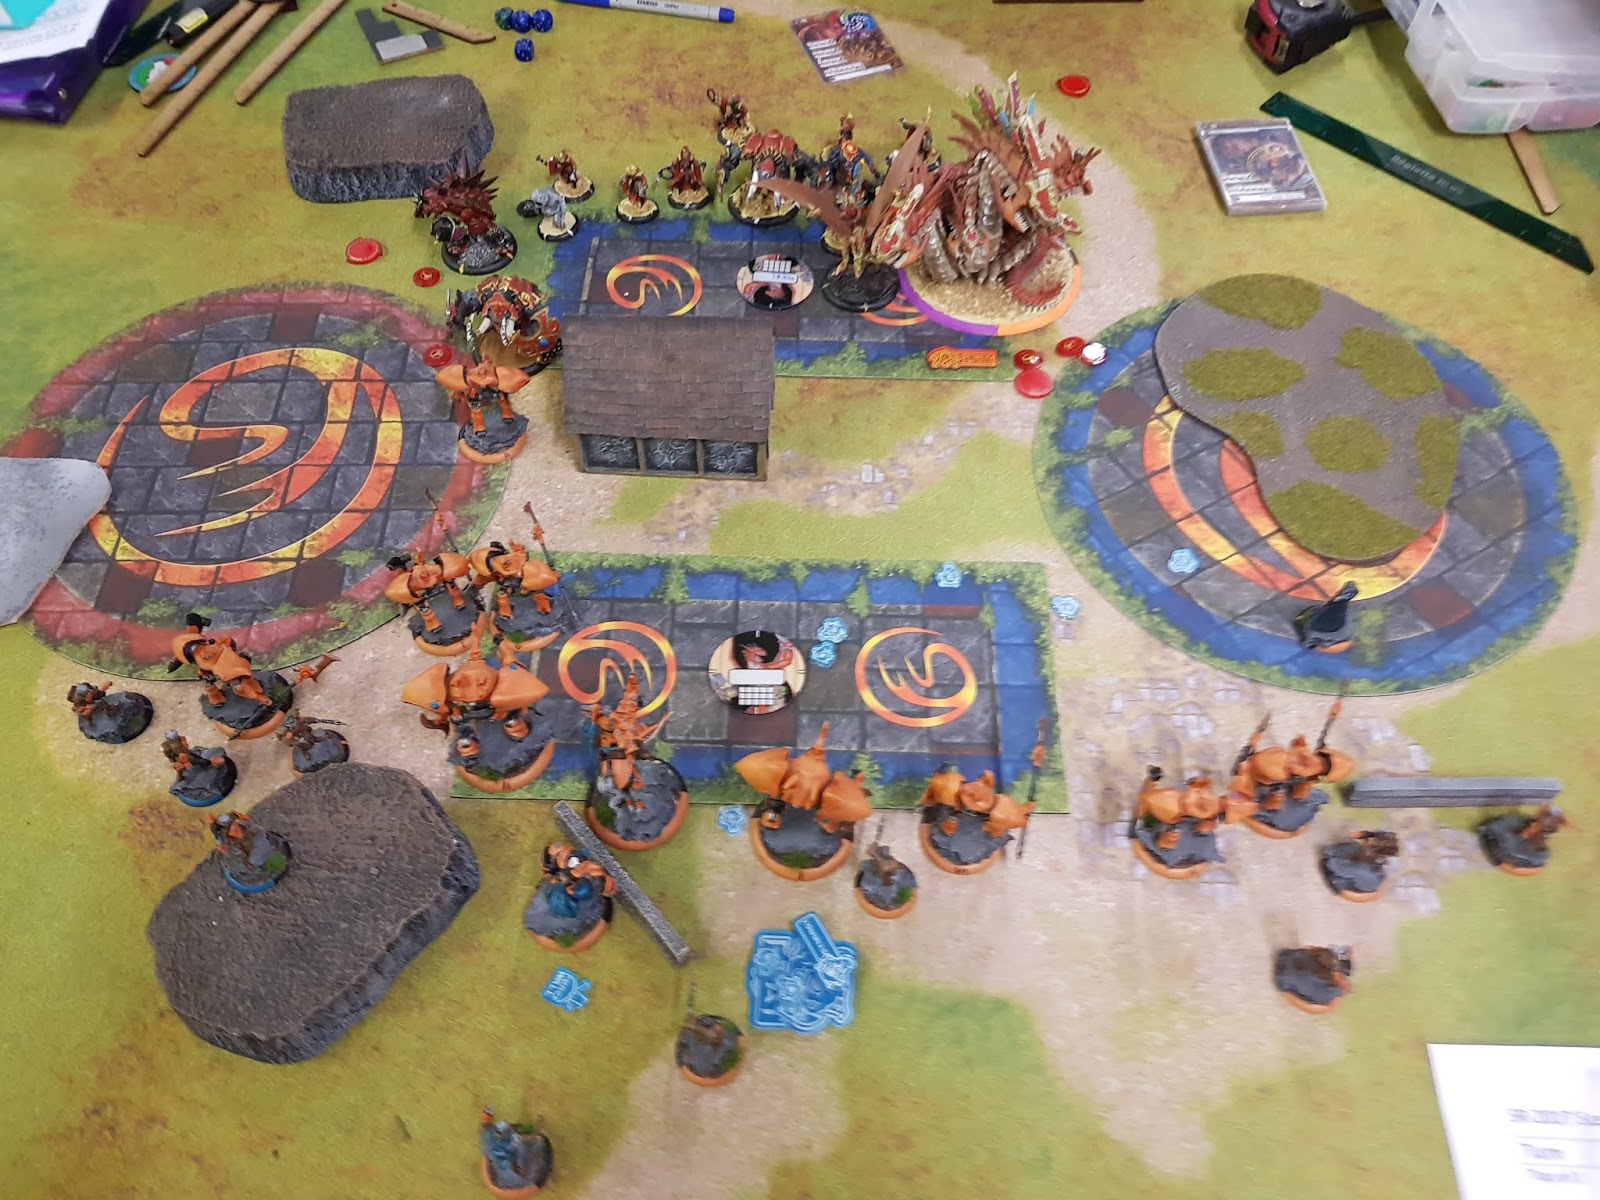
The first photo is Vyros turn 1, which allow me to advance the Hydra in the threat range of three griffins, while the rhinodon was much more cautious because he didn’t want to die too soon. As you can see on the second photo, on the Hydra side the griffins had to turn back and regroup, while on the rhinodon and sentry side my opponent was able to stand his ground. Also of note : she was in charge range of the objective, where a mammoth wouldn’t have been. Because of that, I would have been able to charge and do 4 sprays ; against Vyros Forges of War there is no good target for that, but if he have had dawnguard that would have caused him troubles.
Her status as a garguantuan also give her a laundry list of useful immunities. In particular, immunity to Grievous Wound help her stay fully functional, while immunity to push and place cause trouble to powerful control casters that otherwise give trouble to Zaadesh, like Krueger 1, Haley 2, or Scaverous. Her animus is also worth a mention. While it might seem overkill on surface, it’s still often useful, because guns strong enough to overcome the very high armor in a Zaadesh list often have a rather short range ; the two best examples are Dynamo and Woldwyrds, who can kill an heavy, or even the hydra, through its armor, but won’t kill anything if they are out of range. It’s also much better at protecting agonizers and paingivers, for whom the krea Aura tend to not be enough to save them.
Matchup & comparison
My current Zaadesh list look like that :
[Theme] Imperial Warhost
- (Zaadesh 2) Lord Tyrant Zaadesh [+28]
- Agonizer [0(6)]
- Agonizer [0(6)]
- Archidon [10]
- Basilisk Krea [0(7)]
- Desert Hydra [38]
- Rhinodon [12]
- Titan Gladiator [15]
- Titan Sentry [15]
- Orin Midwinter, Rogue Inquisitor [5]
- Paingiver Beast Handlers (max) [7]
Orin is here to help with the control spell vulnerability (and he can benefit from her animus), while the rhinodon is here because there isn’t enough point for another sentry, so I took the next best thing. Corners were cut.
Compared to the “stock” list, the biggest loss is the lack of free win against unprepared opponent. Unlike the original list, you can’t realistically kill an heavy with your counter charge, or use defensive strike to knockdown a high value model. Thoses tricks tend to lose value against high skill opponents, but this list punish brain fart noticeably less well than the stock list.
On the other hand, the hydra version is more versatile. Faced with something like Exemplar Interdiction, immortal Zaal 2, or Storm of the north, you get much better odds due to the hydra being a real threat to infantry. The list is also less likely to die on scenario, since the hydra often contest two or three scoring element while being unmoveable and very hard to kill.